Since my before and after posts are scattered throughout the blog, this is a handy place where you can check them all out without having to search for years.
Secretary desk:
My love
for interior design goes A LONG WAY back. I actually wanted to study to
become an interior designer after school, but lots of little things
added up, and I ended up studying international business and becoming a
translator. Then I moved to a tiny little flat near Paris with hardly
enough room for my boyfriend and I, let alone for nice furniture. Where
am I going with this? Well... last year, we moved! To a much bigger
place! and all of a sudden we needed more stuff! And I didn't feel like
hanging on to all the Ikea items I had had for years, but I also didn't
feel like buying new/expensive furniture from a shop. So I turned to thrifting, and BAM! I was in love!
It all started with this secretary desk that I drove 2 hours to buy from a man with a hyperactive toddler who kept wanting to show me her cat. And her tricycle. And her other cat. And her tricycle.
As you can see it was in mint condition.
It all started with this secretary desk that I drove 2 hours to buy from a man with a hyperactive toddler who kept wanting to show me her cat. And her tricycle. And her other cat. And her tricycle.
As you can see it was in mint condition.

All it took was a
bazillion hours of sanding and 4 or 5 coats of paint,
plus one roll of wallpaper which travelled all the way from the
Twickenham subsidiary of my company in the UK via Eurostar/scooter/tube.
I also changed the drawer pulls and made damn sure to take this picture
mid-move before installing my wifi and speakers to avoid ugly cables.
Closed

Open!

-------------------------------------
Flower power:

I hesitated for a couple of days thinking it wouldn't be worth the
trouble (it's mostly cardboard and old fabric, some of the petals were
quite damaged and it took a LOT of imagination to convince me), but its
little face in that dustbin kept coming back to me... I couldn't resist!


It's not perfect up close but it looks cute in its new home.

Aren't you glad I rescued you, little flower?
-----------------------------------------------------
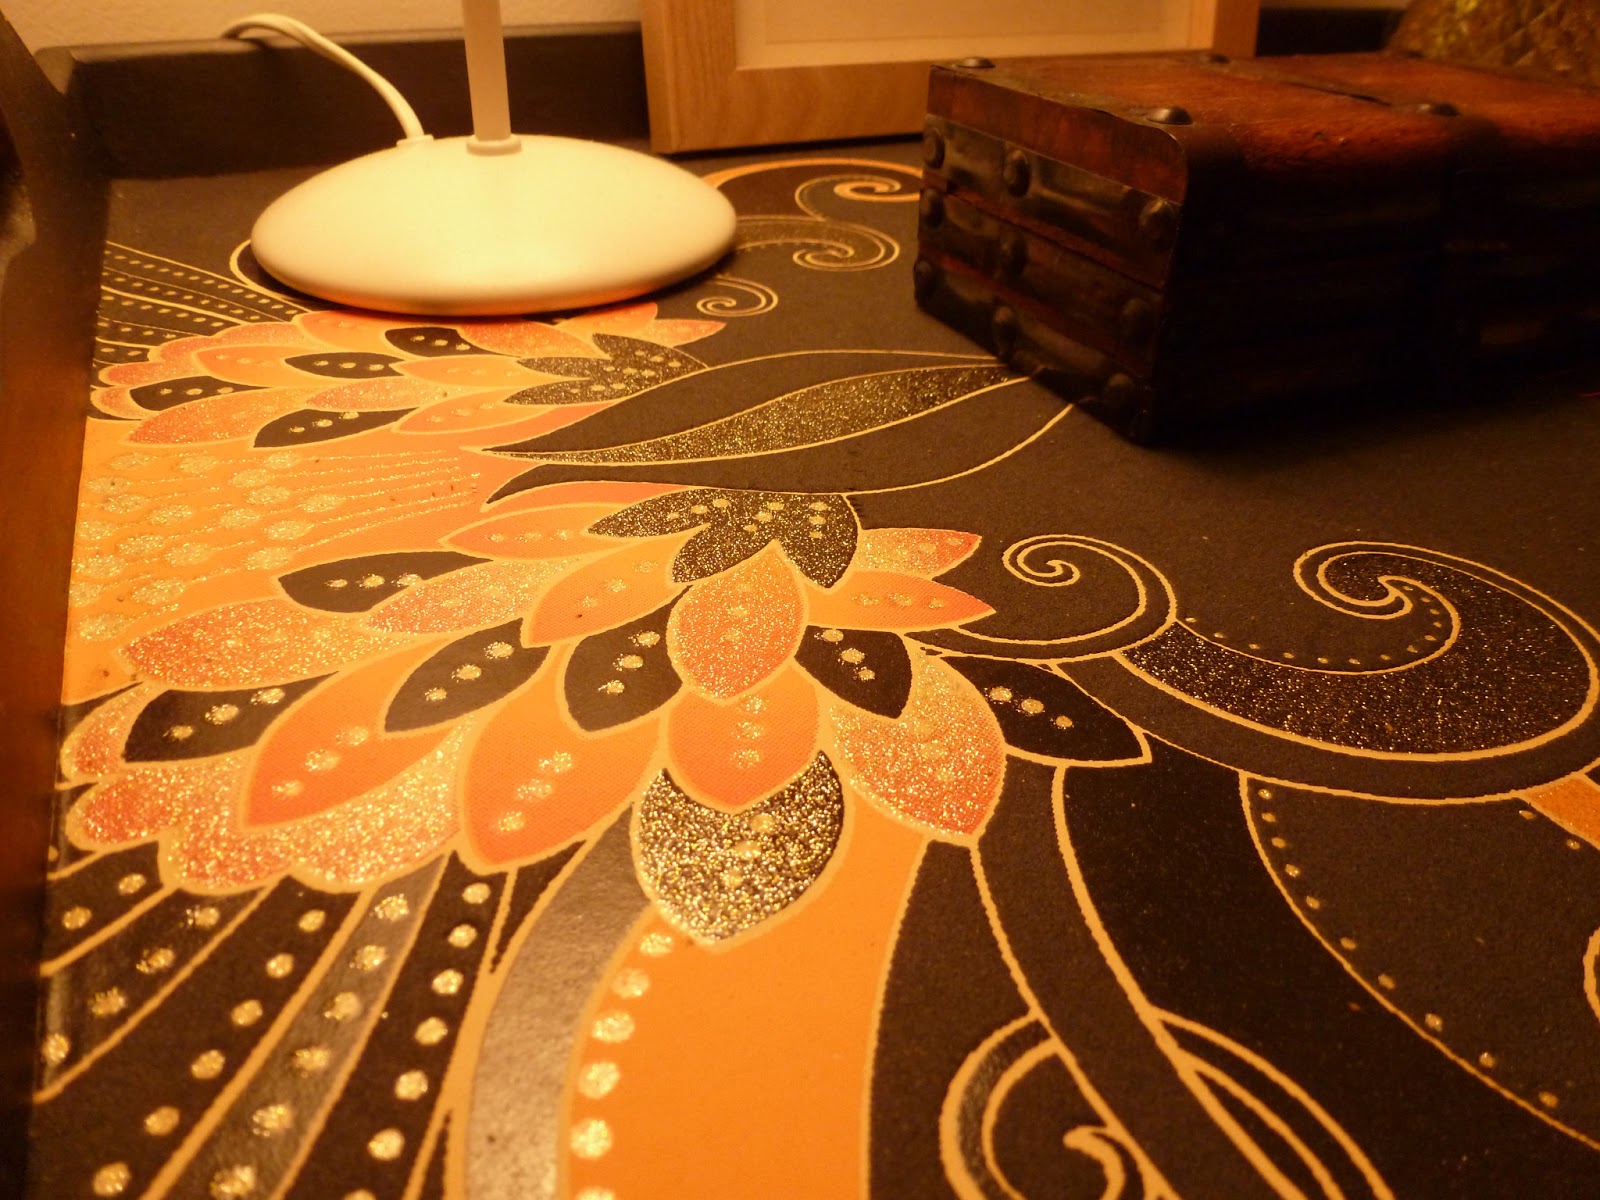
Nightstand
I picked up this plain old nighstand for 3 euro at a flea market right after we moved last year. It was just plain wood, all ready to be painted and I knew it would go perfectly in our guest room/office because of its slight Louis XVI vibe.


I painted it a deep aurbergine purple and gave it a coat of varnish to
protect it from scratches. I spent ages wondering whether to stencil it
or use something like a potato stamp to add some bling. I was thinking
little gold squares to match the lampshade in the office and the Klimt
reproduction in the headboard (more on that later!!), but in the end I
decided to just keep it simple.

Good enough for J.K. Rowling and Pushkin. And a little seashell from St Maarten!
---------------------------------------------
Chevron addiction
another old revamp that I needed to post. Actually, make it two. Here is my official chevron series:

before


before

after
-----------------------------------
Headboard/screen
This
is a post about a sad old screen that my bf bought when we were dating
to keep his cat out of his bedroom when I came to stay since I'm
allergic. I must say, he made a pretty good choice. (I don't have any
photos of his apartment at the time but let me just say you needed a box
of Xanax just to build up the courage to walk DOWN the steps into the
dark and damp underground grotto that he lived in). We inherited a
lovely health bed from my Aunt but it came with a rather plain old
headboard, so I decided to make maximum use of the screen.

The pictures are quite personal without being too corny. I incorporated several foxes and rabbits (guess who is who in our household), the three postcards at the bottom came from the medieval museum in Paris, in the middle we have a reproduction of 'the kiss' by Klimt, as I was saying the other day, and I couldn't resist this cute play on words:


Hard to read from here, but the little poem is the second half of this.

---------------------------------
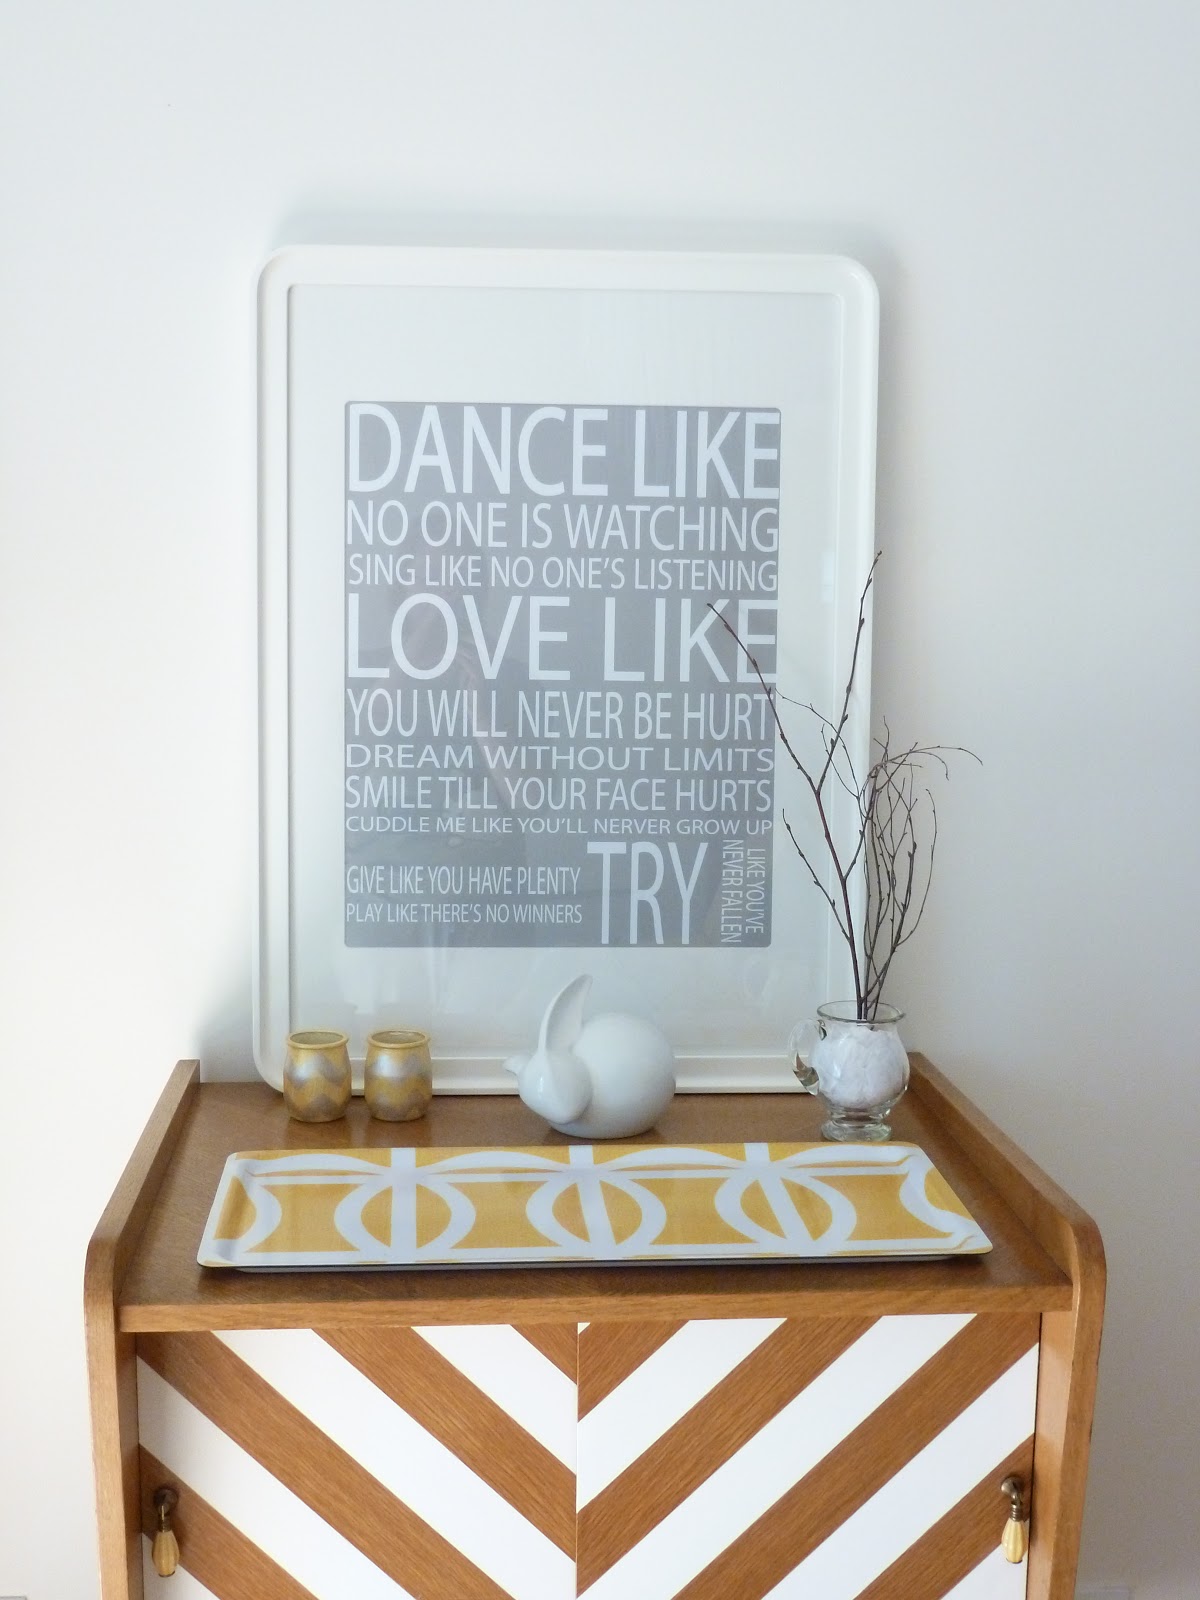
The happy tray table
This weekend I finally got around to finishing my dear little tray
table, and I think this is probably my favourite project so far. I can't
stop smiling everytime I look at it! look:

This is what it used to look like before I sanded it and spent 2 weeks
painting it white. I was going to go with a chevron pattern in gold or
silver on the bottom of the tray, but then I was hit by neon. Wham! And I
had to have some. So here it is:

Here it is again, with a bunny lamp, because no nightstand is complete without one:

And just because my bedroom is now my favourite room, here it is again:

*Yaaaaawn*
Time for bed!!
-----------------------------
The furry lantern
I'll admit I pinched this idea from Pinterest, though I can't seem to
find it anywhere now. If I find the link I'll be sure to add it here.
(Psssst! update! I just found the original here)
Start with a boring Ikea paper lantern. (I haven't got a picture of one,
but you know what I mean: the white paper ball that costs 2 euro).
Add about 50 sheets of A4 printing paper and a roll of tape.
Take a pair of scissors and make sure you've got some episodes of The Big Bang Theory to watch,
Cut away like a mad person for 2 days,
Stick away like a bored person for 3 days,
TA-DAAAA!

This is what it looks like when it's not centered above anything in particular:

And this is what it looks like after your handy boyfriend has spent 2
hours moving it along over the dining room table (also note that he
finally put up the Japanese silk screen above the cocktail cart, YESSS!)
:

Everybody who walks into the room says it looks like a hairy or furry lantern, so this is now its official denomination.
---------------------------------------
Stripes and (sort of) chevrons
This is another before & after of something I bought second hand. look:

Kind of pretty but kind of ugly at the same time. I wanted it because it matched my secretary desk.
Same lines, same wood (at least I thought so at the time! This is
actually laminate while my desk is solid wood...*sad face*). But I
didn't want to make it too matchy-matchy, and I did really grow to like
the natural wood colour (while it sat waiting to be painted for a few
months). So, this is what I did:

I used the same colour palette as for my desk: see the grey footsies?
see the yellow/grey knobs? But I wanted to accentuate the geometric
lines of the wood, so I decided to paint stripes that would join up in
the middle to form one HUGE chevron pattern. That was the initial plan.
Oh how I overestimated my geometry skills. Oh how I forgot to take into
account the fact that the doors would OVERLAP.
Yes.
So.
Anyway.
From this angle, it looks almost OK. Right? Yes. Yes it does.


------------------
Waste not want not/ Neon addiction
I feel a recycling vibe coming along.
It involves pink neon paint.
And an empty hair conditioner tub.
And an empty hair conditioner tub.
Oh and an empty coffee tub, left over wrapping paper from a trip to
Brazil, Decopatch varnish glue (also known as Mod Podge, at least I
think), and ribbon!
Whew!
Ready?


Yes, sorry, I forgot to take any before photos of my actual tubs, but I promise these are the ones!
Add a little time and imagination and you will have...
Add a little time and imagination and you will have...

But wait!
There's more!
I present you...the repurposed neon pink planter:
There's more!
I present you...the repurposed neon pink planter:

(notice that I didn't go with a "pink panther" pun. You may congratulate me)
And the...errrr...storage tub! No surprises here, just that you can get a decent amount of stuff in there if you end up with virtually no other bedside storage like me.

Here is Pot with his new friend Tilo the Tillandsia, those two are
pretty low maintenance. They're currently enjoying the view of the
terrace. Don't forget to drill little holes in the bottom of the planter
for drainage!

Oh to be a tiny succulent in a little pink pot...how dreamy.
--------------------------------
Five minute man
This post will be short and sweet. It involves two of my current
favourites: neon and ombre. Hopefully by the time you've finished
reading it, the pun in the title will have become obvious. Just in case
it isn't (I know my sense of humour is a bit weird so I will provide a
detailed explanation below.)
Take an empty conditionner tub (or two, but it turns out I didn't do anything with the one on the right):

Whip out your trusty foam roller and your beloved tube of neon pink paint and let your imagination run wild for five minutes:

Tada!
Notice I didn't turn this one into a planter. I don't know what it will be yet, a little jewellery box maybe.
Now do you get it?
Five minute man.
Man in Spanish = hombre
Hombre = ombre (almost)
Five minute ombre!
You're welcome.
------------------------------
Prie-dieu Before & After
This weekend, I did not do housework. I did not sort out any photos from
our weekend in Lille and I certainly did not write a post about i.
But it was all for a good cause. I got two major projects done. Dusted. Finito. No more furniture hanging around in the hallway waiting to be painted. Well, sanded, painted, and painted again. But the biggest project I'm saving for tomorow. This one got done in about 35 mins while I was resting my wrist (sanding is HARD).
Remember the prie-dieu?

Well it's now a prie-clothes-hanger-for-the-bedroom:

I'm not sure where to put it yet. Here?
Or there?

Now we can each have our own clothes 'hanger' too, no need to fight over
who has the most 'currently being used' clothes anymore!!
I'm not sure about leaving the wood as it is, I probably decide to
change it in a month or so and either paint the whole thing green or add
another colour. Or sand it and start all over again! Nothing can stop
me now I have a sander!!!
--------------------------
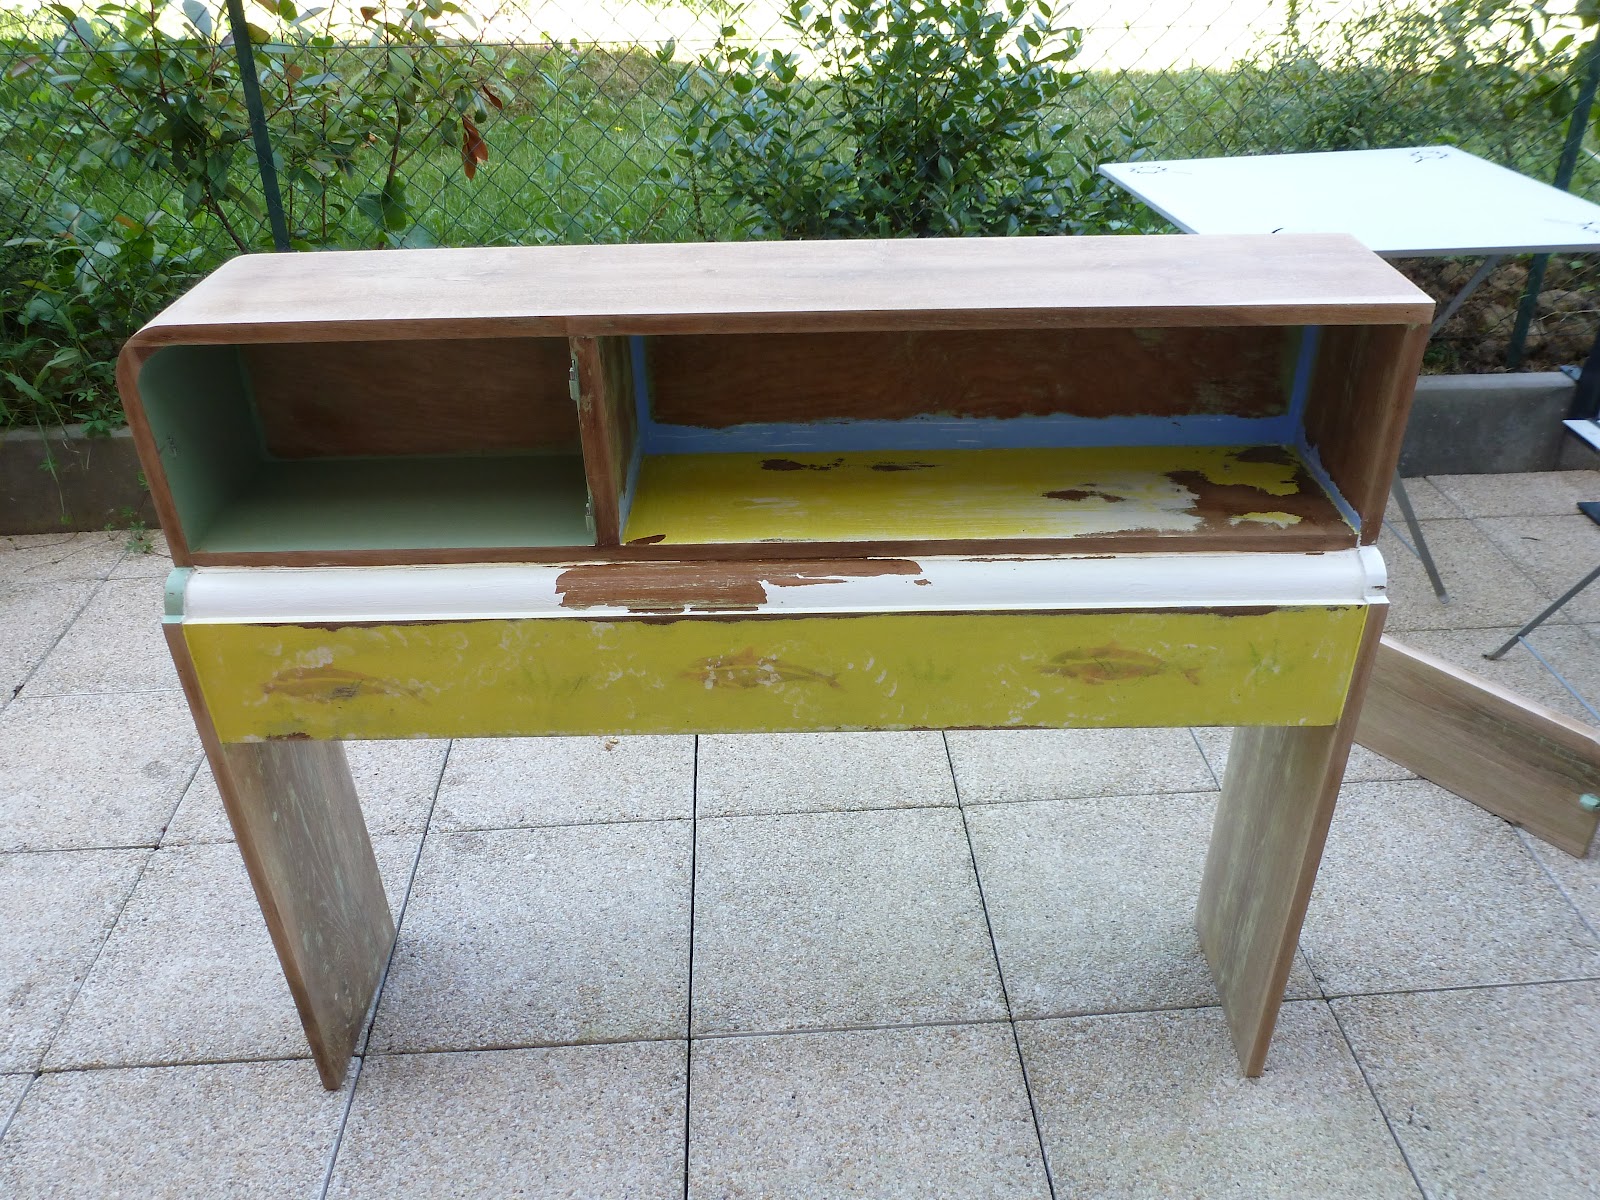
Kitchen counter before & after
I'm
going to keep this sort and sweet since my wrist is aching from 48
hours of sanding and painting and painting again. I'm thrilled with the
result even though it's probably not quite finished. I feel as if it
needs a bit of extra style. Don't know what yet. We'll get there.
Anyway, let's start with a small after pic, just to keep you interested:

Ready for the Before?

Just in case you forgot.

Goodbye Peter!

You're next, captain...

Sanding is super fun

Until
you realise two different types of paint were used and that one kind is
easy to get off while the other is not, and you end up peeling it off
centimetre by centimetre.
Three hours later...

FIVE
hours later!!! I didn't get all the paint off but I got most of it and
made sure all surfaces were smooth. I was surprised when I saw the wood,
I think it's oak, really beautiful solid oak. If I had been able to get
all the paint off I might have left it as it was and not painted it,
but I didn't dare break out the sander for a second day running, the
neighbours would have killed me.
Also by this time I was starting to wonder about sprained wrists, so I called it a day.
The next morning I got back to work.

After FOUR coats of paint I finally started to see results.
 It
was so hard to paint the inside of the shelves that I thought painting
them grey would require fewer coats because I would get better coverage.
Boy was I wrong. The grey paint refused to stick to the white paint.
Some parts have got to be sporting 8 or 9 coats of paint. Oh well, it
looks nice like that, right?
It
was so hard to paint the inside of the shelves that I thought painting
them grey would require fewer coats because I would get better coverage.
Boy was I wrong. The grey paint refused to stick to the white paint.
Some parts have got to be sporting 8 or 9 coats of paint. Oh well, it
looks nice like that, right? 
I let it cure for a few hours while I napped like an old granny, then I carried it inside for the fun part.

I
was going to place it at right angles with the wall to create a mini
counter that would separate the kitchen off from the dining area, but I
tried it and it looked a bit strange. So this is where it's living at
the moment, but it might move around a bit more while I make up my mind.


Like?
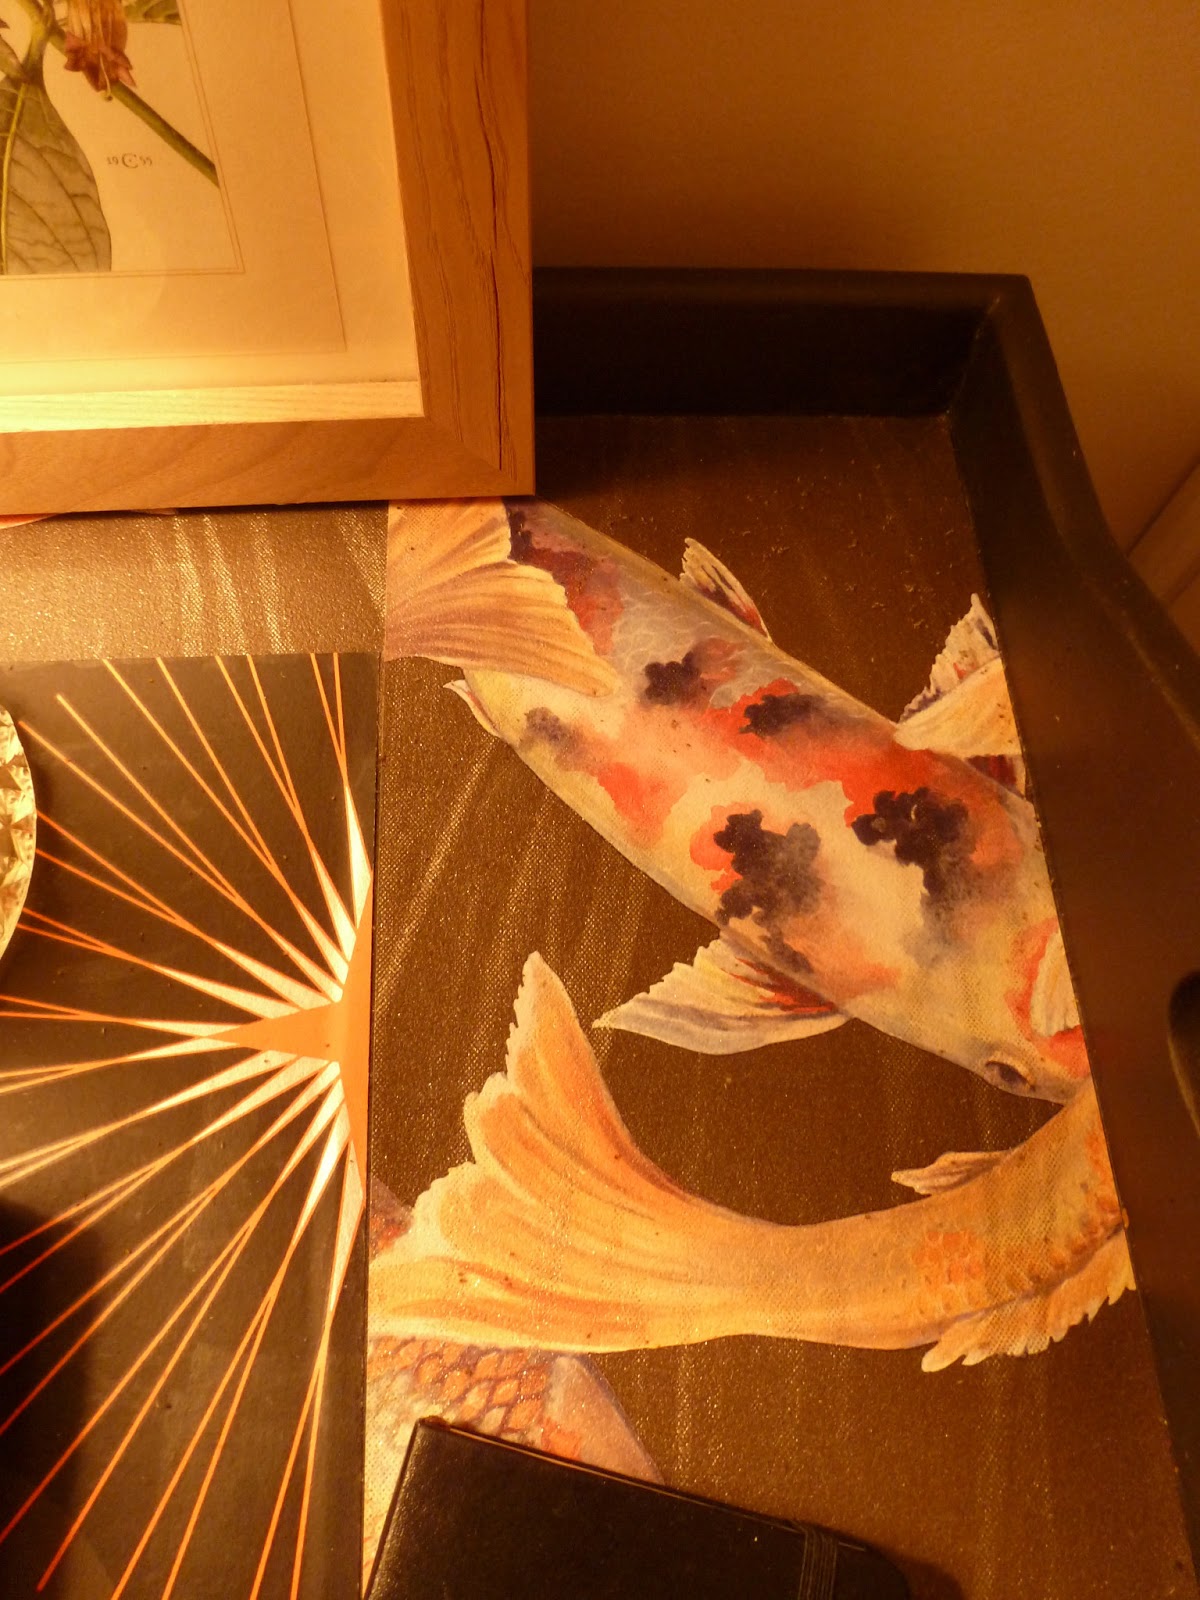
Tray table before & almost after
----------------------------------
Tray table before & almost after
Those have got to be two good reasons, yes?
Last June (yikes!), we went to the famous Emmaüs sale in Paris (read the whole story here) and bought a €10 tray table that looked like this:

Then I went over to Wallpaperdirect and ordered a few samples for a few Euros (more info here).

6
months later, I finally got round to doing something about the guilt I
felt everytime I walked past that sad little table folded up in the
hallway.

It's
far from perfect because I ended up using only three of the samples and
there wasn't really enough to go around and I had to cut little slivers
of paper and stick them here and there to cover up my shoddy work.

But
let's just pretend I never said that and that you didn't notice. We
used the table loads over Christmas for our snack fuelled Miranda-thons
but it doesn't go in the living room at all colour-wise. I was
originally planning on selling it as we really didn't need it, so I just
went with random colours that I liked for once. The other day I got a
bit sick of seing it in the living room and had a mad weekend switcheroo
session that involved 3 lamps and 2 tables.

This is what I ended up with: a bigger nightstand in the guest room!

It
all looks very yellow in these pics, but really it's nice and cosy and
just right. Now all I need to do is get a pane of glass cut to fit over
the wallpaper for protection. Let's see how long it takes... I already
tried a DIY shop down the road but they stopped cutting glass 10 years
ago (maybe update your website to save people a bit of time??) so who
knows where I'll go or how long it will take.
In
the meantime we're trying to be careful not to damage the paper. The
paint is already a little scratched in places and it really needs
another (4th!!) coat and a coat of varnish... can you tell I can't be
bothered?
So
there you have it: undeniable proof that I'm not some kind of
perfectionist maniac. And that I have a slightly pointless obsession
with tray tables.

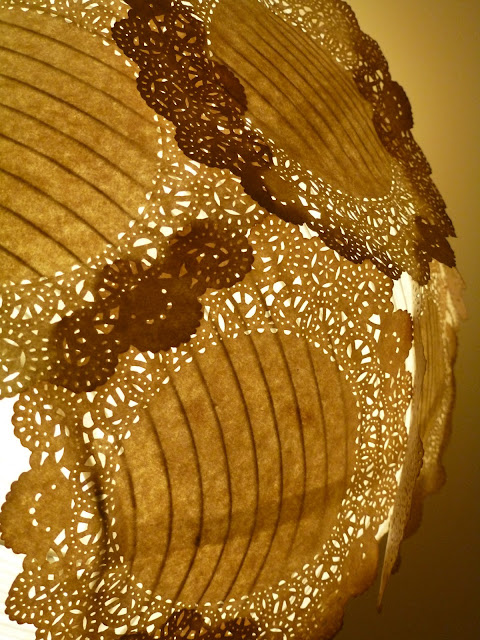
Think about how long it took and decide on something faster and cozier with a vintage feel. Think doilies. Tea-stained doilies.

Go to Ikea. Change your mind and go for the pear-shaped shade instead of the round paper shade. Such extravagance.


--------------------------------
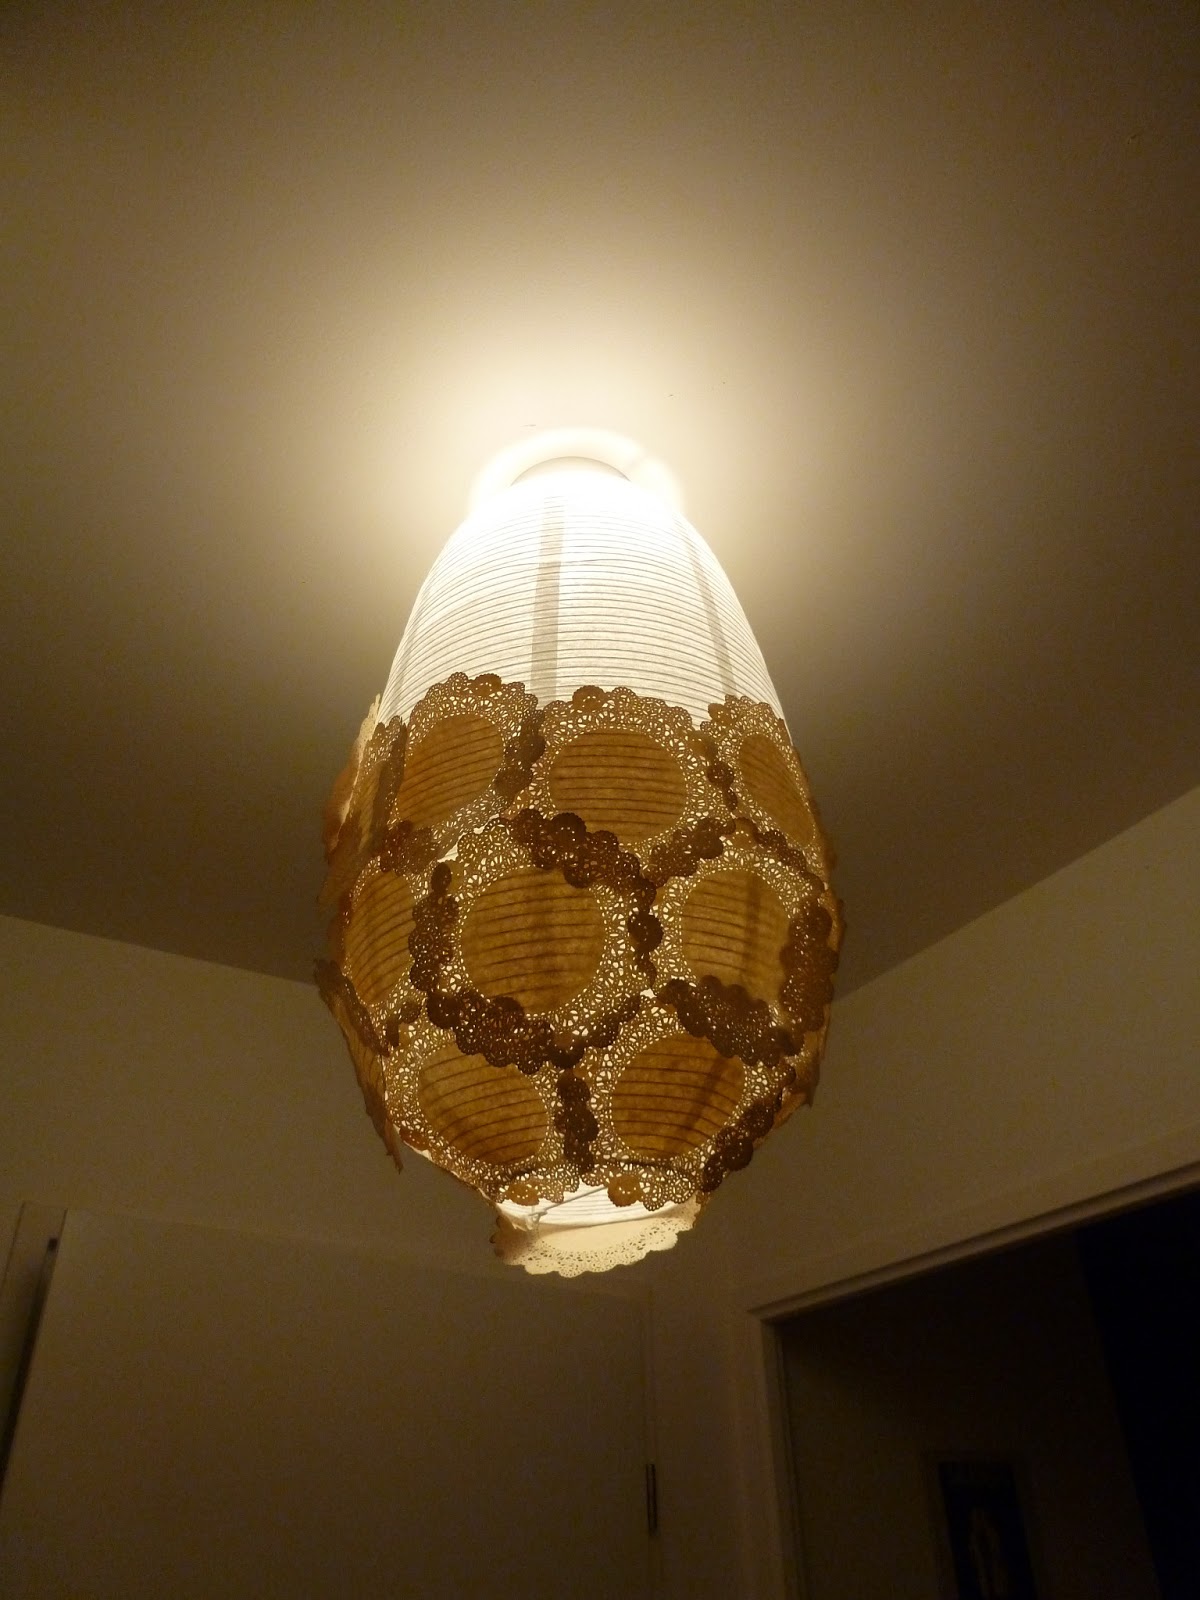
Toiling with doilies
First,
take an age to decide what kind of vibe you want to give your very bare
mini-hallway. Take into account the only element of decor: the black
and white family photos of yore.
What else can be added? Oh yes: light.
Think back to your yeti shade project.
Think about how long it took and decide on something faster and cozier with a vintage feel. Think doilies. Tea-stained doilies.

Go to Ikea. Change your mind and go for the pear-shaped shade instead of the round paper shade. Such extravagance.

Oh
yes, I forgot, this stage is essential: take a bunch of photos of the
before, during, materials, etc., then accidentally delete them. Resort
to using the official Ikea website photo that stinks.
Whip
out your vintage rose-coloured masking tape and start taping doilies
onto the shade. Go into the kitchen to make some tea. Come back: doilies
are all on the floor. Give up on masking tape. Whip out the liquid glue
and paintbrush. Go doily-crazy.
Halfway
through: run out of doilies. Pass second order to Singapore and pay
double postage. Notice after paying that the price of the doilies has
skyrocketed. Too late. Wait two weeks. Upon arrival, doilies are a
slightly different colour and texture than the first batch. Pray that
nobody will notice. Spend Sunday evening arranging doilies that are reluctant to stick while listening to old and embarrassing tunes of yore (like this).

The room looks pretty dark in this picture, but really it just gives the small space a nice and warm feel.


I think I quite like it.


I will call him Andre.
No comments:
Post a Comment